

| Terminology is the key to knowing what you're getting yourself into,
but little common sense and rationalizing can go a long way. Most prototype
talk revolves around a few key terms like "hard copies" and "first shots".
Also, knowing the differences between steel production molds and preliminary
silicone molds is important.
The process for creating all of these items is important also in recognizing what it takes to get a toy from concept to the store shelves. As you read and see terms you are unfamiliar with, just scroll down and they should be explained in another section. This stuff is all interrelated, so some things may seem to be presented out of order. I've tried to include everything though because I find more times than not, someone will undoubtedly be lost on a particular issue. If it looks long, that's because it is. There are many details that need to be explained with each of these processes - details that could mean the difference between knowing your stuff and not. Differences that could cost you hundreds of dollars. |
Original Sculpting
|
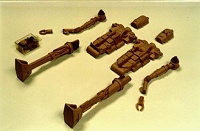
| Mock-Ups
Some toys and action figures are developed with the "kit bash" method. This term is taken from modeling where one would use parts from different kits in order to create a modified airplane, ship or automobile. These "bashed" figures are generally used as design concept mock-ups and are a good way for the designers to get their point across without having to spend a large amount of time developing the basic figure or toy. Details can be added or subtracted from existing pieces and painted accordingly. Sometimes these mock-up figures will be utilized in early product photography. Probably the most famous figure mock-up in the world of Star Wars is the Boba Fett figure as it first appeared as a mail-in offer. Thanks to the eagle-eyes of collector Ron Salvatore we can plainly see that the Boba Fett was made from the torso of C-3PO, the arms of a Stormtrooper and the legs of the Death Squad Commander. All parts were modified and painted of course, but the basic shapes are unmistakable. The head and backpack were constructed separately and apparently from scratch, but the time saved by using these existing parts must have been great. Many other mock-ups for Star Wars figures and toys have shown up in collecting magazines over the past several years. Toys from totally different lines or manufacturers were used in this fashion making the possibilities endless. |

Image of "kit bashed" Boba Fett from the Star Wars vinyl collector's case insert (courtesy The Star Wars Collector's Archive) |
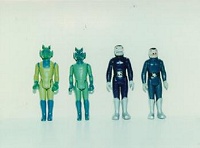
hardcopies (left) alongside final, production versions (Courtesy, The Star Wars Collector's Archive) |
|
Hard Copy A "hard copy" is just what the name implies - it's a hard copy of a figure, but not of the standard figure. It's actually a copy of the original sculpting and it is the product of a silicone mold. They're called hard copies because they are made of a polyurethane that is harder and usually weighs quite a bit more than the normal plastic used on production figures. The urethane is generally comprised of three parts: a catalyst, a hardener and a pigment. Any color can be added, but only after the catalyst and hardener have been mixed together will the urethane solidify. All hard copies are hand cast, hand painted, and hand assembled by the people involved in the design process. Each part must be cleaned up and sanded at the joints so that they can be prepped for assembly. Holes must be drilled in each part because the limbs and head are held on with metal pins. Because dowel pins are used to hold the limbs on, the figure can easily be taken apart. Hard copies do not have holes in the feet or copyright markings on the legs as these additions come during the steel mold making stage. Hard copies are used as approval samples and, more importantly, the unpainted ones serve as tooling aids for creating the steel molds. Painted hard copies serve as paint masters so the production folks will know what part gets painted a certain color, or what plastic base color to use. Because there is no shrinkage involved in casting a hard copy, it is dimensionally identical to the original wax sculpting. A slight bit of detail may be lost, however, between the hard copy and original due to the reproduction process. |
| Silicone Molds
Silicone molds are made by hand from the original wax sculpting of the figure in order to produce hard copies. Each part of the figure requires a 2-part mold to be made which allows for easy removal of the cast part once it has set. A mold is made for each individual figure piece. It is up to the artist or mold maker to determine where the "parting line" will be. Basically, the part to be molded is half covered with clay so that it's opposite side can be molded. This is called the "parting line" of the mold and it is usually identical to the parting line of the steel molds. This is all pre-planned by the designers because accurate placement of the parting line is essential to the manufacturing process. You can look at just about any action figure and see the parting line. Once the first half of the mold is made, the clay is removed and silicone is poured onto the imbedded part against the first half of the mold. This will yield the second, mating, half of the mold. Holes are added so that the material can be poured into the resulting cavity. The urethane material is poured in by hand and no machinery is involved in making the hard copy. Once the urethane has set, the mold is separated and the part is carefully pulled from the mold which is then prepped for reuse. Sometimes a "mold release" agent is sprayed into the mold prior to casting in order to assist in the removal of the part and the separation of the mold halves. This would be similar to putting butter in a frying pan to prevent sticking. Sometimes a certain degree of shrinkage can be seen in the silicone molds which invariably means that the finished parts will be smaller than the original. These molds are relatively crude and will only yield a certain number of copies before they degrade. If all goes well during this process, and a good hard copy or two is produced, then the mold and the sculpting can be discarded as they have fulfilled their duties. For more info on how these silicone or "preliminary" molds are made, check out this site: http://www.smooth-on.com/howtomold.htm |
| First Shots
First shots are among the very first plastic figures to come from the steel molds. Typically, they are characterized by their lack of dates on their legs and their sometimes unusual coloring. Because they are preliminary pieces, any color of plastic can be used to mold them as the accuracy and functionality of the mold is what's being checked rather than the aesthetics of the figure itself. Many first shots are not painted and a some can be found unassembled. First shots are basically identical to production figures, but not all of them are "sonic welded" together. First shots can be found hand-painted or machine painted and some have turned up which are machine painted and colored like the production version but are actually fully painted figures. Basically any color of plastic can be used to make the figure and it will be painted correctly. For instance, a painted Romba first shot could be cast in white plastic, painted brown and then have the facial accents painted on. This figure would resemble it's production counterpart but differ because the production version would be molded in brown plastic and have only the facial accents painted on. |
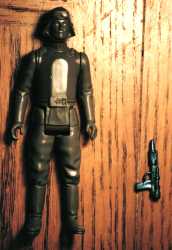 AT-AT Commander first shot |
| The most important thing that describes a first shot is the absence
of the copyright dates typically found on the legs of Star Wars figures.
However, in the case of Paploo, the production figure does not have these
dates so it's important not to confuse this with a first shot. A convincing
Paploo first shot has to exhibit some of the other signs of being a first
shot before one could call it that.
Remember that first shots should be the same scale as their production counterparts. First shots require steel molds and expensive steel molds wouldn't be made in the non-production size. This basically only affects the EV-9D9 and 8D8 2-ups and the Micro Collection 4-ups though. |
| Steel Molds
The generic term for these molds is "steel", but aluminum is frequently used because it is softer and easier to machine than steel is. Since the plastics used to make toys are non-abrasive, aluminum would be a good choice due to the fact that production won't wear them out. If the plastics are abrasive (meaning they have a high glass content) then steel molds are required because the injection process would wear out soft metal like aluminum. Even after awhile, steel molds will show signs of wear if a glass-filled plastic is required to run in them. Metal molds can be "cut" in two different ways. In order to machine the metal, a three-dimensional pantograph is used to trace the hard copy. A stylus traces this pattern and the contours are relayed to the milling machine. Utilizing very small cutting tools, fine details can be reproduced in the metal. The metal must usually be highly polished after the pattern is cut in order to keep the plastic from sticking in the mold during use. Steel could be cut this way too, but as the material gets harder, the cutting tools tend to get bigger (so they won't break) and this means that some details might not be recreated in the metal. Electronic Discharge Machining, or EDM is another method of "cutting" a pattern into metal. This machine works on the principle of "reverse welding" and uses an electrode to "burn" away the unwanted metal. Since there is no physical contact involved, nearly any shape can be created in the metal. Many times, the electrode itself is machined or cast to resemble the toy which would remove the problems of tracing any pattern in the metal. Electrodes wear out, so several off them would be made in order to properly machine the metal. The "cuts" get finer and finer as the series of electrodes is used up and the end product is a very polished cavity resembling the toy part. This process is similar to pushing your finger into putty and leaving behind a contour of your finger and fingerprint, The steel is not being displaced however, it is actually being blasted away. EDM techniques can be used on the hardest of steels and are the choice for most work involving tight tolerances and complex shapes. Because of the copying process, fine details cam be lost at this stage of figure development. Usually the first details to go are small features like cloth pleats, hair and facial wrinkles. Nowadays, technology has made it possible to capture very fine detail that would have been lost years ago. As in the silicone molds, each part of the figure requires a two-part steel mold to be made. Several "sub molds" or "cavities" are created and placed inside a large mold "frame" so that one cycle of the molding machine can yield several kinds of parts, but all made of the same plastic. This also allows for the use of generic sized frames and cavities which means cavities can be swapped in and out and frames can be used for many different parts. The cavities themselves could be swapped with replacements (if damaged) or replaced with cavities for parts that were needed at the time. Multiple molds can be made in order to increase production yields which is evident by looking at the dates stamped on the legs of most old Star Wars figures. Many different text sizes and combinations can be found for identical figures which signifies that each was made from a different mold or mold cavity. Molds are made of steel and are not trivial in cost or complexity. Think of how tough steel is and consider the difficulty in transferring the shape of your favorite figure into a large chunk of it. So when you hear the term "steel mold" just remember that Joe Shmo doesn't have the equipment or money involved to make them. The copyright dates and "foot holes" on action figures are added at this stage of the development process. After molds have been qualified and ready for production, the dates are added. This is why first shot figures do not have the dates present as they are "first" trials of the mold and not production pieces. Also at this process the limbs and head are modified so that, after being molded, they can be assembled. This means that the joints will differ from the way they look and function on the hard copy. Bulbous stubs will be added to protrude from the head so that it locks into and rotates on the torso. The limbs are made similarly. It's possible that some preliminary, design-stage metal molds are made in order to assist in the creation process. There is at least one known example and it's made of brass. These could have been used to make some early first shots just to see what a molded figure would look like. Another explanation for the preliminary molds is that it could probably have made life a bit easier on the steel mold makers. They would only have had to replicate the existing "negative" (the shape of the part) in steel rather than create this negative from a positive (the actual hard copy). Anyway you look at it though, first shots take mondo time, effort, money and equipment to produce. You can get a good idea of what steel molds look like here: http://www.pmbc.com/picture/picture.html Here's a process for casting EDM electrodes, and mold cavities themselves, into any shape utilizing a method that requires no machining: http://www.precisiontechnologies.com/brochuresSinterMetKeltool.html Injection Molding Machines and Related Equipment It is difficult for the average person to grasp the concept of how different it is to make a first shot figure from injection molded plastic than it is to make a urethane hard copy unless he knows what kind of equipment is involved in the former. Injection molding requires a steel mold that will withstand tremendous pressure and heat involved in "shooting" or injecting molten plastic. Molding machines are big and heavy and their capacity is measured in tonnage. This describes the force that will hold the two halves of the mold together as the plastic is being shot into it. A 30 Ton press is relatively small and ones going up to 100 tons are not uncommon. That's a heck of a lot of force, folks! Many production molding machines are about 6 feet tall, 5 feet wide, and 12 feet long so you can guess that something of this magnitude isn't within the grasp of your average bootlegger. In addition to the machine itself, other equipment is involved such as dryers, regrinders, heating systems, forklifts and hoists. The plastic material itself is also a huge part of the process. Plastic is sold in 1000 pound boxes and is nothing more than tiny pellets that look like very short bits of spaghetti. You need a hoist to get the mold into the machine because those things weigh several hundred pounds. The dryer uses a vacuum to suck the pellets from the box and move them into it's hopper. The plastic will stay in the hopper for a pre-determined time in order to remove all moisture from the "virgin" material. Moisture in the plastic is a no-no in molding as the steam produced can cause major pressure (explosion, spattering, popping) problems. In order for most molds to function properly, they must be heated. An auxiliary heating system is used to pump hot water (at a constant, predetermined temperature) into the molds. The molds are designed with channels for this purpose and the water comes nowhere near the plastic. Some molds utilize electric heaters and have heating elements imbedded into the steel. Mold temperature is a very important variable in the molding process. Some of this molding equipment can be seen here: http://www.stackplastics.com/ Tons of textual info on molding can be found at: http://www.endura.com/endura.htm Injection Molding Process The molding machine uses a vacuum to move the plastic from the dryer to it's initial holding chamber. This chamber is actually a small hopper on the back of the "barrel" of the machine. The barrel is where all the real work is done and it's essentially a large screw housed in a heater which moves the plastic closer to the mold. As the screw turns, the plastic traverses the barrel and reaches a molten state. Only when it's molten can it be injected into the mold with a rapid turn of the screw. The tip of the barrel is called the "nozzle" and from this point to the cavity in the mold, the material is not heated and is constantly cooling. The "runner" is the cooled/set plastic that extends from the nozzle to the cavity and is process scrap. Actually, the cooled material from the nozzle to the mold is the "sprue" but it's connected to the runner. There are ways around having sprues and runners, but it's beyond the scope of what we're talking about here. Most people have probably seen runners before and not realized it. The most likely place to see runners are in model airplane/car kits as the individual components are left attached to the runner system. Typically the runners are ejected into a chute below the mold or else they will be picked out of the mold by a robotic arm. Either way, they are then free to be dumped into a regrinder. The regrinder chops the runners into bits and prepares them to be moved back into the dryer. Once plastic has been heated though, it degrades and some molding processes will not allow for "regrind" to be mixed back in with virgin material as it can cause problems with the final part. In cases like this, the regrind is used elsewhere or it is discarded completely. Shrinkage plays a crucial role in molding and some plastic can shrink up to 20% as it cools. In order to combat this phenomenon in critical plastic pieces (not really toys), it is up the mold designer to build this factor into his design so that the finished parts will meet the original product design specifications. "Ejector pins" are part of the mold itself and are used to push the molded parts from the cavity once the mold is opened. This ejecting process is controlled by the molding machine. Action figures show no marks from these ejector pins, so these parts either fall out of the mold on their own or else the runners themselves are pushed out by the ejector pins. Since the part is still hooked to the runner it is forced to be ejected from the mold. The molding cycle is basically "close - shoot - open - eject". The mold is clamped into the machine with the front half remaining stationary (on the barrel side of the machine) and the back half being the movable half. Also on this movable half are the ejector pins that push the molded parts from the cavity. When all molds open up, the parts are stuck to the back half of the mold so that they can be ejected with the built-in pins. For more information on the injection molding process, check out these sites: http://www.jobshop.com/jobcyclopedia/cyclo/plasticinjmolddef.htmlhttp://www.endura.com/endura.htm Hand Painting and Machine Painting Both hard copies and first shots can be hand painted. In the case of hard copies though, they are always hand painted because at that stage of the creation everything is done by hand. The most important painted hard copies generally serve as paint masters so that the people in charge of production will know what part of the figure gets painted a certain color. These masters also help them determine what the base color of the plastic should be in order to minimize the amount of paint required. For instance, using white plastic for a Stormtrooper means that only the black accents will have to be painted on. First shots are hand painted when the automatic painting process hasn't been set up or the "masks" haven't been prepared yet. Masks are used to cover up certain areas of the action figure so that only specified areas will be painted by the machine. Usually there is a different mask associated with every color to be put on the figure. Some first shot figures have been found that have hand painted accents in addition to machine painted ones. Sonic Welding Once the molded figure is ready to be assembled, all the components are gathered. These parts typically include the head, arms, legs and the torso which is (usually) made in two halves - front and back. The parts are assembled, and once clamped in the torso, will not come out. In order to seal the torso so that it remains intact, it is sonic welded. Gluing could do the job as well, but that would require a separate process and additional expense. With sonic welding, the assembled figure is subjected to high-frequency sound waves which vibrate the seams of the plastic and cause friction, thus high, focused heat. This heat actually melts or welds the figure together. The process is very clean and allows for a strong, nearly unbreakable bond to be formed. |